When we took on this project, I had envisioned doing a light but thorough sanding of the interior followed by two or three coats of varnish. After sanding a little, I realized that the original varnish was no longer in tact in the area around each of the approximately 1,000+ plank/rib clench nails. To assure lasting protection and integrity, it was decided that all of the old varnish would need to be removed.
Stripping the old varnish turned out to be a more daunting task than I had originally envisioned. The chemical stripper that I used had a hard time breaking down the varnish. It took several coats of stripper and much scraping and rubbing to get down to the bare wood. With some experimenting, it was found that the most productive way to remove the varnish was with a heat gun and a scraper.
Most of the varnish was removed with the heat gun and scraper. Then the chemical stripper was used to remove the final bits from seams and tight spaces. The stripped area was then sanded and bleached. The bleach was used in hopes of lightening the dark stains in the wood around each clench nail. I don't believe the bleach had any effect on the stains. This was fine because the stains actually contribute to that natural patina we love so well.
After the interior was stripped and sanded, a few minor repairs had to be made before we could begin with the varnishing. Two of the floor boards had suffered from rot. Wood from the damaged areas was removed and the new cedar was spliced in. The punctured plank was repaired by removing the damaged area and a new piece was shaped and epoxied in its place using West Systems epoxy.
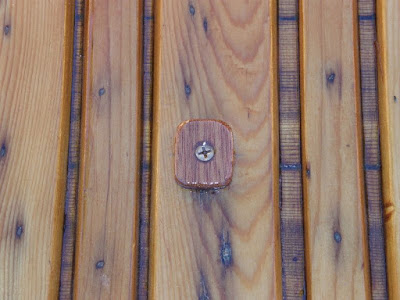
The keel bolts (screws) were very corroded and the wood around them had deteriorated over time. I removed the affected wood, filled the void with putty made of West Systems epoxy and wood flour. Mahogany plates were placed over each repaired keel bolt for cosmetic and structural reasons.
The first of three coats of Epifanes Gloss Clear Varnish brought out the rich colors of the cedar planking and ribs. The next couple of coats brought out the bright luster. The gunnels had been sanded earlier and were now varnished as well. The outwales would be removed for the canvassing and needed more varnish work later after the final assembly.
Showing posts with label varnish. Show all posts
Showing posts with label varnish. Show all posts
Sunday, March 14, 2010
Monday, September 28, 2009
Varnish and Paint


 After applying two coats of CPES Penetrating Epoxy Sealer, Tom applied three coats of Epifanes Clear Varnish with a light sanding in between each coat. After the varnish cured, the boat was flipped and prepped for painting. After applying two coats of Interlux Primer and two coats of Interlux Brightside White paint with, once again, a light sanding in between coats, we are close to being finished.
While the various coats cured, Tom laminated knees for the fore and aft center thwarts. Once the boat was flipped back over again, he was able to fit, shape, sand, varnish, and install them. He also installed the stern seat slats after painting the bulkheads, built a bunk for the customer's dock, and ripped three ash bows for use with the boat's cover. After attaching all of the bronze hardware, you can't help but marvel at the beauty of this boat.
Row, row, row your boat...life is but a dream.
Friday, September 18, 2009
Finishing Out the Interior (Part Three)


The building phase is just about complete. This week, Tom added the trim and the sunburst design to the bow seat. We had ordered three sets of brackets (they were chrome as bronze was not available). Each would hold a flexed piece of wood which would then "tent" the cover so that water would not pool on it. But, it just didn't feel right putting those metal brackets on this beautiful wooden boat, so we didn't. Tom fabricated brackets out of mahogany and they blend in much nicer and look far better than the metal ones. He also built the oarlock chocks, rounded the edges of the gunwhales, drilled the stem for the bronze bow eye, applied two coats of penetrating epoxy and the first coat of varnish.
Presently, Tom is building the stern seat. The slats will be cut to match the sunburst design on the bow seat. Also, he is laminating the knees for the fore and aft center thwarts out of Phillipine Mahogany.
The oars arrived from Shaw and Tenney (http://www.shawandtenney.com/) out of Orono, Maine and they are beautiful. They're 8' flat blade spruce with 10" sewn leathers.
Row, row, row your boat...life is but a dream.
Labels:
bow eye,
bow seat,
brackets,
epoxy,
gunwhale,
oarlock chocks,
Phillipine mahogany,
quarter knee,
Shaw and Tenney,
stern seat,
thwarts,
varnish
Subscribe to:
Posts (Atom)


