After spending many, many hours sanding the epoxy on the interior and exterior of the hull, we are ready to start building again. The gunwales are the next step. The scuppered type that we install are more work than most other types, but we feel their good looks are worth the extra effort. The scuppers give the traditional look that canoes had when ribs extended between the inwale and hull. The scuppers also allow all of the water to be drained from the canoe when tipping it on its side.
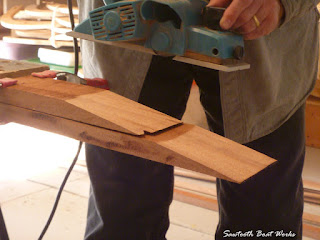
We needed lumber about 16.5 feet long for the gunwales so we scarfed an extra section on to the end of the piece of African Mahogany that we chose in order to get it to the necessary length. An 8:1 scarf was used.
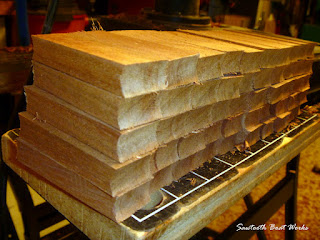
The scupper pieces are cut to length with a drill bit to give then a radius on each end. About 50 of them are used.
The scuppers were then epoxied in place on the sanded hull.
The breast hooks were then installed at each end.
The inwales came next...
...followed by the outwales. The outwales are different from the inwales in that the last three feet of each end has been tapered to a narrower depth. This gives the ends of the canoe a much finer look which really improves its appearance.
Some creative clamping is required in order to coax the gunwale into meeting the rise at the end.
All of the pieces come together to form a strong, rigid hull.
Showing posts with label scarf. Show all posts
Showing posts with label scarf. Show all posts
Thursday, September 15, 2011
Thursday, July 30, 2009
In Between the Planks
A bevel in progress.
There are a number of things that need to take place after one plank is completed and the next plank is ready to be epoxied into place.
Bevels:
The first step is to remove the 85+ screws used to clamp the previous plank while its epoxy cures. Once the screws have been removed, the edge of the plank can be trimmed flush with the stringer it is attached to. The router makes quick work of the trimming except around the stem, transom, and bulkheads. In these areas, the trimming is done with a combination of saw, file, and plane. Once the edge is trimmed, a line is drawn 3/4" from the edge of the planking marking where the edge of the next plank will lie. The space must be beveled so that it is on the same plane as the adjacent stringer so that the next plank will have a flat area to lie on. Some beveling will need to be done on the adjacent stringer for the same reasons. Besides beveling the plank edge and the stringer, the bulkheads and transom must also be beveled to accept the new plank. The final step in prepping for the next plank is cutting the gain which was covered in a prior post.
Fitting the plank:
Fitting the plank:
To fit the next plank, the planking stock is clamped to the boat and lines are drawn on it using the stringers for guides. The plank is rough cut a few inches wider than the lines to provide some room for adjustments and to provide for the 3/4" that needs to be added for the 'lap' section that overlaps the adjacent plank (that we just beveled). Once the new plank has been cut out, it can be re-clamped to the boat and new, more accurate lines can be traced onto it. The plank is then removed again so that 3/4" can be added to the arc drawn for the lap edge. A batten is then used to connect the 3/4" marks and redraw the curve. The plank is then sawn about 1/8" outside this line and then a plane is used for final trimming to the line. The final step for this plank edge is to sand it with a sanding block further fairing the curve and putting a slight radius on the outer edge.
After the lap edge is ready, the plank is clamped back on the boat to continue with the fitting process. The lap edge is checked to see that it matches up with the 3/4" line that was drawn for the bevel on the adjacent plank. The fit at the gain is also checked and adjusted as needed. If all fits well, then a line is drawn 3/8" in from the lap edge which will designate the middle of the stringer below it. This will be used when laying out screw locations. If the fit looks good, a couple of screws will be put in to keep the plank from moving throughout the rest of the fitting. The middle of the lower stringer can now be transferred to the plank and marks are made about every four inches on both the top and bottom lines for screw locations. After pre-drilling all of the screw holes, the position of the scarf is marked and the plank is removed to cut the scarf. Epoxy is brushed onto the plank and the boat before applying thickened epoxy to all of the mating surfaces. After the plank has been screwed to the boat, all of the epoxy 'squeeze out' must be cleaned up immediately. Excess epoxy is scraped off and then a final cleaning is done using acetone.
That completes the fitting of one of the half planks. Attaching the other half plank entails the same steps with a few slight differences. The scarf will now be on the bottom of the plank instead of the top like the previous plank and two inches must also be added to the plank for the scarf. Each full plank takes about six hours to complete. (6 hours x 12 planks = 72 hours of planking).
Row, row, row your boat...life is but a dream.
Labels:
bevels,
bulkheads,
epoxy,
fairing the curve,
gains,
lap joints,
planking,
scarf,
stringers,
transom
Wednesday, July 29, 2009
Scarf Joints

When Tom finishes, there will be twelve planks on this boat, or in actuality, 24 half planks. The planking material isn't long enough to span the entire length of the boat so two half planks are joined somewhere near the middle of the boat. The joint that connects the two planks is called a scarf. Scarfing is the process of beveling each plank so they can be overlapped and epoxied without creating any additional thickness to the plank. Tom uses an 8:1 scarf on these planks. This means that for every one increment of plank thickness, the bevel will be eight increments wide. For this boat, the planking stock is about 1/4" thick so the bevel needs to be 2" wide. The bevel will start at the full thickness of the plank and will end at the end of the plank in a feather edge. One plank will be beveled on its topside and the other on its bottom and when the bevels are slid together, they will equal the thickness of the plank. The 8:1 scarf provides a large surface area for gluing and makes for a very strong joint. Once the epoxy has cured, the scarf joint will be stronger than the rest of the plank. Aside from aesthetics and strength, another benefit of this type of joint is that it allows the plank to continue its fair curve and not develop a flat spot that other joint types, such as a butt joint, would.
Row, row, row your boat...life is but a dream.
Subscribe to:
Posts (Atom)


